My Ender 3 is on the operating table and is under the wire cutters.
- obirobkenobi45
- Jul 27, 2023
- 3 min read

What's up, My OG Ender 3 is under the The wire clippers so I can make it Better.....Faster....... More Efficients. This is what I did to supercharging my OG Ender 3, achieving blazing fast print speeds, and resolving those pesky cooling issues that arose during the surgery.
Introducing the Sonic Pad for Speed
One of the first upgrades I decided to tackle was boosting the printing speed of my OG Ender 3. After some research, I stumbled upon the Sonic Pad, turnt out to be a fantastic solution to achieve faster printing without compromising quality.
Following the instructions that came with the Sonic pad kit, This high-quality upgrade promised to make a significant difference in the printer's performance.
Tackling Cooling Issues with Blockhead STL
While the Sonic Pad took care of the speed, I soon realized that my stock cooling system wasn't up to par, especially when printing at higher speeds. Cue the Blockhead STL! This incredible design, available on thingiverse.com, Dpetsel offers cooling ducks and fan mounts tailored for various 3D printers, including the Ender 3.
Downloading the STL files was a breeze, I sliced the files using Cura. I'll have another post shortly with the settings I use so stay tuned. After printing the cooling ducks and fan mounts on my EnderS1 Plus, I carefully removed any support structures and cleaned up the parts to ensure smooth installation.
Following the clear and concise instructions provided by the designer, I mounted the cooling ducks and fan mounts on my OG.
Leveling Up the Hotend and Cooling Fans
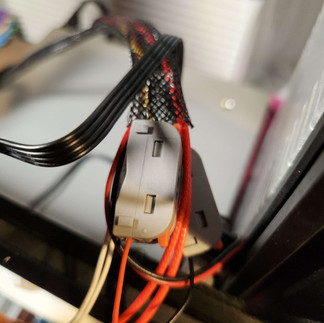
With speed and cooling improvements underway, I decided to go the extra mile and upgrade my hotend and cooling fans. I did my research and and came across high-quality 12-volt fans on Amazon that looked perfect for my needs. But here came the challenge: My OG Ender 3 operates on a 24-volt system, and these new fans required 12 volts. The solution? Buck converters!
Before proceeding, Armed with wire stripper, clamp connectors and heat shrink tubing, I delicately removed the old fans from the original Hotend enclosure. I clipped the wires leaving plenty of wire on the connector side, using the clamp connectors I wired them to the new high performance 12 volt fans. I then connected the buck converters to step down the voltage to 12 volts between the fan and the printer so the fans operate optimally.
I double-checked everything before reassembling my Ender 3.
And that's how I transformed my trusty Ender 3 into an absolute powerhouse! With the Sonic Pad, cooling upgrades, and 12-volt fan installation, I've achieved print speeds two to five times faster than the original design. Plus, my prints are looking better than ever, thanks to the improved cooling.
Remember, when diving into such modifications, prioritize safety and take your time to understand the process thoroughly.
And yes you are seeing correct that is not a stock under three extruder, more on that install to come.
Creality Sonic Pad Based on Klipper Firmware 7 Inch Touch Screen 3D Printer Smart Pad with Higher Printing Speed for Creality Ender 3 Pro/Ender 3 V2/Ender 3 S1/Ender 3 S1 Pro FDM Ender 3D Printers https://a.co/d/h56fWGJ
HELIFOUNER 490 Pieces M3 x 4mm /6mm /8mm /10mm /12mm /14mm /16mm /18mm /20mm /25mm / 30mm, Hex Socket Head Cap Metric Screws Bolts Washers Nuts Kit, 304 Stainless Steel https://a.co/d/5xr4JLI
Noiseblocker BlackSilent Fan XM-1-40mm https://a.co/d/9cuNSC1
Songhe LM2596S LM2596 with LED Display Voltmeter Buck Converter DC-DC 4.0-40V to 1.25-37V 2A Voltage Adjustable Board Step Down Module Power Supply Module (5pcs) https://a.co/d/9klGGIj
50mm x 15mm 5015 12V DC Brushless Cooling Blower Fan, Dual Ball Bearing, 2 Pin Terninal https://a.co/d/aUDsNt4


Comments